How to Report an Issue in Marker.io
Everything you need to set up, report issues, and track them during UAT — from one simple widget.
Table of Contents
Marker.io is how you’ll report feedback during User Acceptance Testing. This tool adds a “Report an issue” widget directly to your site — on the front end and inside the WordPress admin — so you can flag something the moment you spot it, without leaving the page or switching tools.
Getting set up
A few quick, one-time steps before you start reporting:
- Accept your invitation
You’ll receive an email invitation from Marker.io. Click it, complete the short form to create your account, and you’re in. (This step is required — it’s what links your reports to you.) - Install the Marker.io browser extension (required for desktop testing)
It’s available for Chrome (recommended), Firefox, and Edge. The extension is required because it captures the screenshots and technical details we rely on to reproduce and fix issues. There’s one exception for mobile — see the note just below. - Go to your UAT site
Follow the directions provided to access your UAT site environment — usually by logging in to WordPress or using the private link we provided. - Make sure you’re logged in to Marker.io
This is what connects each issue to your account, allows us to communicate, and makes it show up in your dashboard.
A quick note on desktop vs. mobile:
- On a computer — the extension is required. Install it in Chrome (recommended), Firefox, or Edge and use it for all your reporting. It’s what captures the clean screenshots and technical details we need to fix things quickly.
- On a phone or tablet — there’s no extension. Browser extensions don’t exist on mobile, so when you’re testing on a device, report using the on-page “Report an issue” widget instead and describe what you’re seeing. If you can, take a screenshot on your device and attach it — that helps a lot.
Reporting an issue
Once you’re set up, reporting takes just a few seconds:
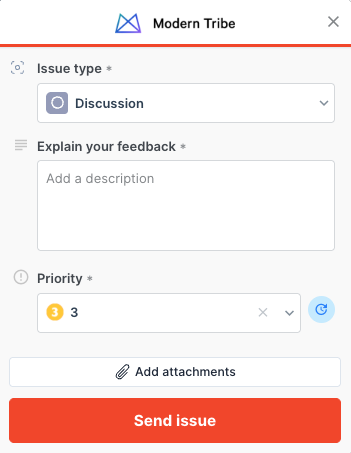
- Open the widget. Click “Report an issue” in the bottom-right corner of any page — front end or WordPress admin.
- Annotate the screenshot. Marker.io grabs a screenshot automatically. Use the tools to circle, draw, or point out exactly what you’re talking about.
- Describe the issue clearly. A sentence or two is usually enough, but be clear to avoid confusion. If needed, include the steps you took and the expected behavior. “The contact form doesn’t submit when I click Send” is perfect.
- Choose the issue type. Is it a bug, an enhancement, or a discussion?
- Set the priority. Pick a priority from 1 to 5 so we know how it stacks up against your launch.
- Add a screen recording if it helps. Optional, but great for anything that’s easier to show than to describe.
- Click Send. That’s it — your issue is logged and on its way to our team.
What gets captured automatically
You don’t need to gather any of this yourself — Marker.io includes it with every report:
- The page URL where you found the issue
- Your browser and operating system
- Your screen size and device details
- Behind-the-scenes console information our developers use to reproduce the problem
That’s why there’s no need to take your own screenshots or jot down technical details during UAT. The widget handles it.
After you submit
- Track everything in your dashboard. Log in to your Marker.io dashboard anytime to see the status of every issue your team has reported, along with our updates.
- Watch for email notifications. When we comment on or update one of your issues, you’ll get an email so you can follow along without checking constantly.
- Reply right on the issue. When we respond with a question or an update, you can reply directly on that issue to keep the back-and-forth together.
Keeping the conversation in one place
To make sure nothing gets lost, please keep all discussion about a specific issue inside that issue in Marker.io. If you spot a problem, report it through the widget rather than mentioning it in an email, a chat message, or the comments column of your UAT spreadsheet. One issue, one place — that’s how we make sure every piece of feedback is seen, tracked, and resolved.
(The UAT spreadsheet’s comment column is still useful — just for notes about reviewing and approving a feature, not for reporting issues. More on that in How to approve features.)
Related: Issue Types · Priority Levels · How to approve features